
Cheese Grater - 1


St Paul's Tower


Sheffield Hall Clocktower - 1

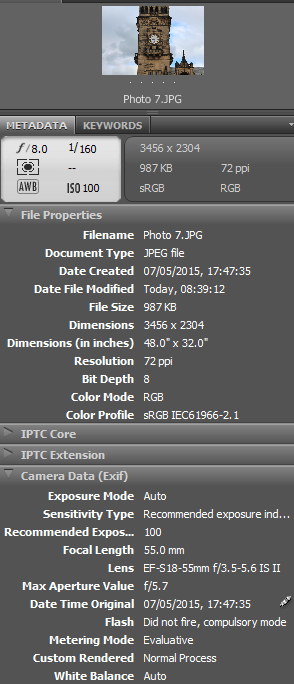

I will use this photo in the finished image as I am happy with the lighting, it is at the angle I wanted where it could fit well as a watch on an arm, and I think it is lit well to fit. It denotes a standard angle of the Sheffield Hall Clocktower where it is zoomed in to be able to cut it into the shape I want so that the image could act as a watch on an arm, just as my sketch intended. In the background there is the sky, and the foreground features the clock tower, alongside the rest of the Sheffield Hall. The image is pretty well framed a the tower is in the centre of the image connoting it is the significant part of the image. I do think I should have taken this as a portrait shot instead of a landscape shot so there would be less to crop, therefore leading to a higher quality image. For shutter speed I used a medium to fast shutter speed of 1/160th of a second. This is because I took the image at a later time than some of the other pictures and so I needed a little bit more light than before. However I made sure to not have an overwhelming image and I wanted to keep some of the lighting as it makes the clock tower look a little bit more old through a hint of dullness in the lighting. For the aperture, I used a fairly low aperture of 8.0 as since I took this at a later
I Quarter -


This photo denotes the I Quarter building taken in a portrait shot (since it is a vertical building and if I took it in landscape I'd have to crop the image, making it a lower resolution), at a low (but not too low) angle where the weather around it varies in light. I will use this image in the final portfolio, by placing the building over a water bottle in a double exposure. For the shutter speed I used a quick 1/250th of a second as almost-direct sunlight was captured by the camera and so a quick shutter speed was needed. However I felt that since the building covers some of it and I wanted to give it a dynamic feeling, I had not used to quick a shutter speed. For aperture a fairly low aperture was used as I did not want to overwhelm the camera too much, since the image was intended to be to capture the building to cut it onto something else. In terms of ISO, I felt that adjustment wasn't necessary since the aperture and shutter speed could have controlled the light well enough, and any tinkering with it could have removed the effect of the lighting.
Park Hill - 1


This photograph will be used in the final portfolio of photographs. This is because it denotes a clear shot of the entire building allowing it to be altered in photoshop to resemble it being on another planet. It isn't lit too extreme in any specific areas, there's an overall consistency to it. Around half of the image is the sky which would produce a large amount of light, meaning that I had used a fairly quick shutter speed of 1/200th of a second since I did not want to overwhelm the image with light, but I also paid attention to the fact that the image was taken at a slightly later time than others with a more grey sky, so I didn't use too quick a shutter speed as that would allow not as much light as I want in the image. For the aperture I used a fairly high aperture of f4.0 as with a quick shutter speed with half of the image only half covered in light, a high shutter speed with a low aperture wouldn't have captured enough light for a decent image, and I also wanted to try capturing an image where the aperture was the deciding factor of the lighting, which created a more
Arts Tower


This will be used in the final collection. This image denotes the arts tower in a portrait shot, with low key lighting for an emphasis on cool colours. The angle is a little bit off as there is a slight slant, but this doesn't matter since the texture of the image is what I want, where I will place it onto the arm of somebody in double exposure. Since this image is taken at late evening, I had used a pretty slow shutter speed of 1/100th of a second to have a lot of light taken in without any kind of over-saturation. For aperture I used a fairly high aperture of f.5.0 to increase the amount of light taken in without any depth of field effects that weren't necessary for the image's sake. For ISO I used really high ISO of 4000 so I could make the light appear bluer than black since cool colours were what I was going with with the image of the arm.
Hayley image
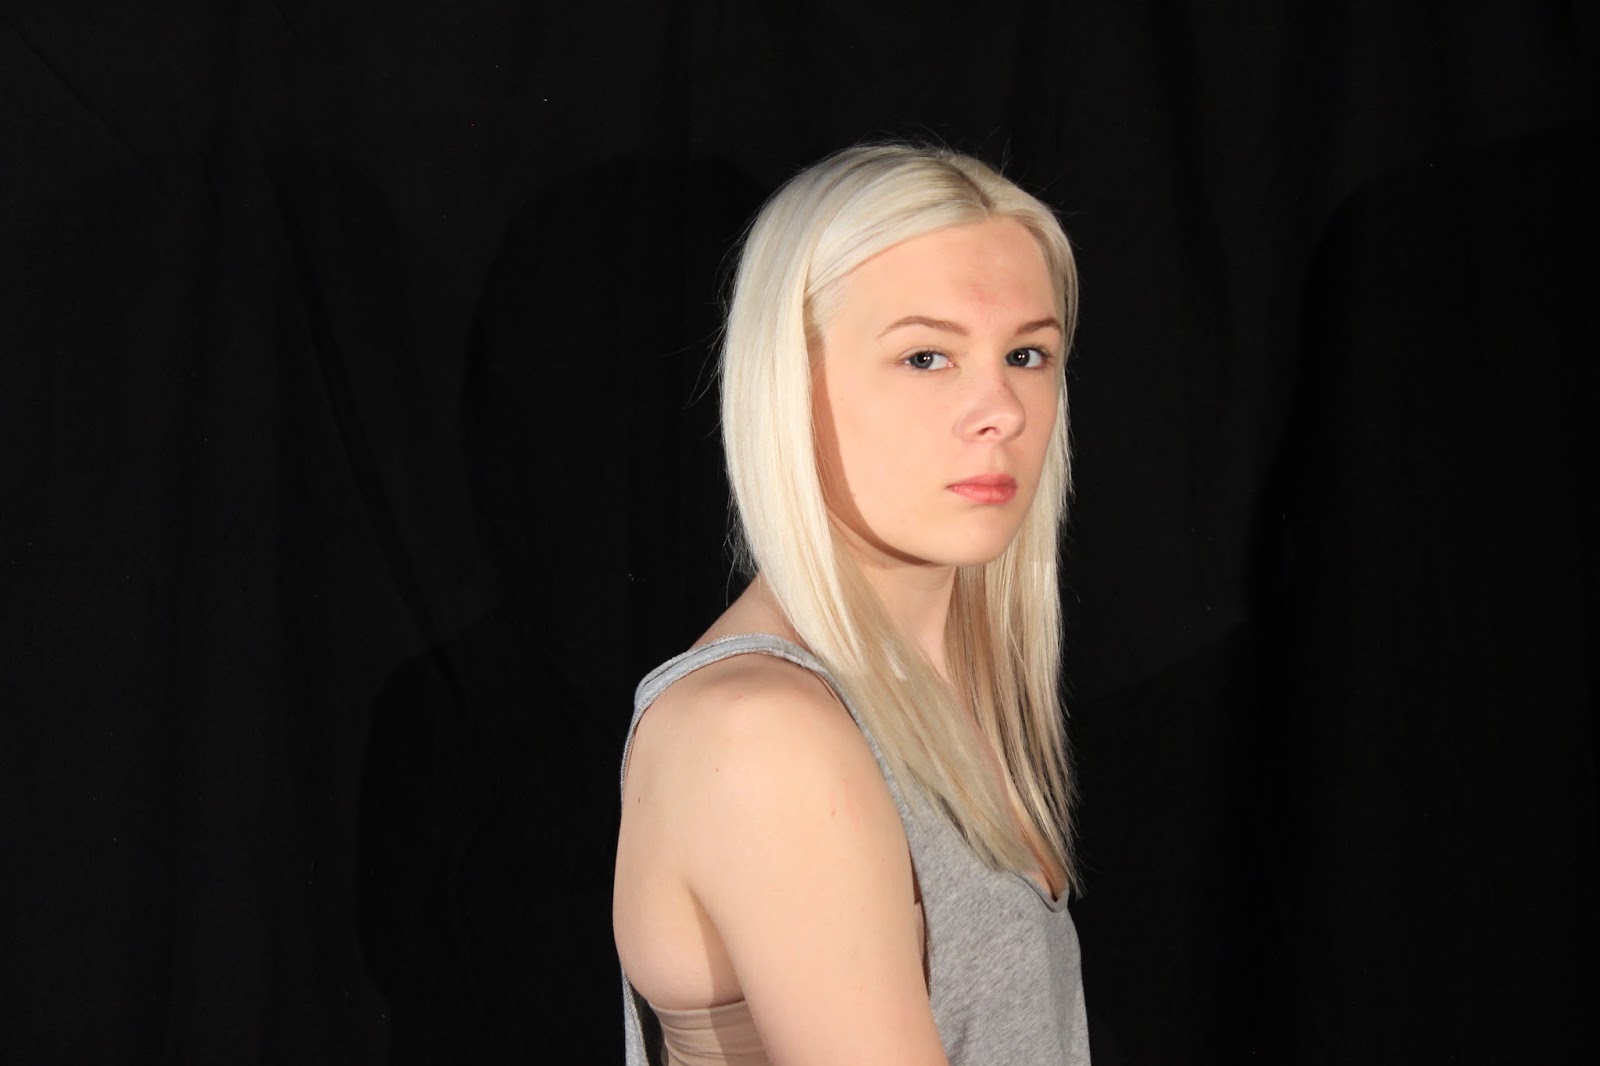


This photograph will be used in the final collection. It denotes the model facing in the direction that my sketch had planned in front of a black background, easy to cut out to change the background. The lighting is high key on the face to make the facial features clear to see which is necessary for placing buildings over in double exposure. Since the background is completely black, I had used a slow shutter speed of 1/50th of a second so I made sure as much light as possible (without overwhelming) got into the camera. For aperture I used a fairly high but not too high aperture of f 5.6 as I felt that the shutter speed did a well enough job at capturing the light, and no depth of field effects were useful. For ISO I used a high ISO of 800 as I really wanted to high key aspects to shine in this for the double exposure work I was planning to do.
Peace Gardens water fountain balls

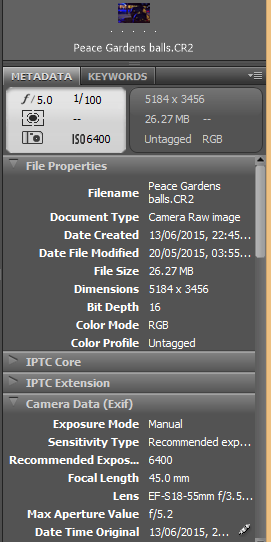

This photo will be used in the final collection of photos. It denotes the peace gardens water fountain balls in low key lighting with the reflections lights and restaurants shown in the water. This will have no cutting of any kind, rather this will be placed onto a hand in double exposure, as if there is a hand shaped window to the image. I wanted cool colours since the sketch had planned for the arts tower at evening, so I made sure that the blue reflections from the pizza express were integral to the image, and low key lighting helps elevate that. For shutter speed, since the lighting was low key I used a fairly low speed of 1/100th of a second as while there are multiple light sources (alongside reflections) this is taken at night and so a lot of light needed to be taken in. For aperture I used a pretty high aperture of f 5.0 to take in additional light and for emphasis on the reflections. For ISO I could have done a little bit better as I used a high ISO of 1600 where the light is well controlled as it is dark where I want and has the cool colour, but there is a grain that is noticeable when zoomed in.
Boot


This photo will be used in the final collection. The image denotes a boot in a grassy area with a hint of light coming from the background. I really wanted to take advantage of depth of field with this one to connote the relevance of the boot. I used a quick but not too quick shutter speed of 1/125th of a second as this is taken early in the morning, but it isn't too quick as as the ground covers the whole image - no sky, and this image was taken under a tree which would shadow the light. I made sure that the light in the background was shown. In the final image I will plan to increase the exposure and make the image a little warmer. For aperture I used a high to medium aperture of f 5.6 as while I wanted to take some advantage of depth of field and I needed a lot of light, I didn't want the image overwhelmed with light. For ISO I had used a low ISO of 320 so there wasn't any grain of any kind in the image and that I thought the shutter speed and the aperture had controlled the light well enough for what I wanted to create.
James


With editing to lighting, this image will be used in the final collection by cutting the person out and placing him over a skyline, looking to a miner image. Because the location I took this in was fairly dull with lighting I used a very slow shutter speed of 1/30th of a second to capture as much light as possible to make cutting out in photoshop as easy as possible. There was no movement in the person's actions and so a slow shutter speed worked well. Because of the dull lighting of the location I used a high aperture with an fstop of 3.5 to really distinguish James from the background, since easy cutting was a priority. For ISO, I didn't think ISO would have been a priority and so I had used a low ISO of 125 since I felt the light was already controlled enough by the shutter speed and aperture, and I especially didn't want to overwhelm the image with light here since I wanted to treat the image as a canvas for lighting edits in photoshop, by experimenting with different vibrancy, exposure, gamma etc.
No comments:
Post a Comment